The Loomis Method is a popular drawing technique that simplifies the process of sketching the human body. By breaking down complex figures into basic shapes like circles, ovals, and cylinders, artists can focus on proportions and structure before adding details. This method is ideal for beginners and experienced artists alike, as it helps improve accuracy and speed in figure drawing. At Blogaroo, we love sharing tips and techniques like the Loomis Method to help you enhance your artistic skills. Whether you’re a beginner or looking to refine your techniques, the Loomis Method is a valuable tool to add to your drawing toolbox.
What is the Loomis Method?
The Loomis Method is a drawing technique created by artist and teacher Andrew Loomis. It helps artists learn how to draw the human body in a simple and clear way. By breaking the body into basic shapes like circles, squares, and lines, this method makes drawing easier. It teaches you how to focus on proportions, meaning the right size of different body parts in relation to each other.
The method is mainly used by beginners because it simplifies drawing. Instead of getting lost in details, you learn to draw by focusing on big shapes first. Once you get those right, you can add smaller details later. The Loomis Method also helps with drawing faces, heads, and bodies in the right proportions.
By using this technique, artists don’t have to worry about making mistakes with proportions. This method guides you to create well-proportioned figures, which is key for realistic and balanced artwork. The Loomis Method is very popular because it works for all kinds of art, from cartoons to realistic drawings.
The beauty of this method is that it helps you understand the body better. Once you practice, you’ll be able to draw people in different poses with ease. It’s like learning a recipe: once you know the basic ingredients (shapes), you can create any dish (drawing) you want!
How the Loomis Method Helps Beginners with Drawing
For beginners, drawing can feel overwhelming. But the Loomis Method breaks it down into easy steps. It starts by teaching you how to draw simple shapes, and gradually, you build these shapes into full figures. This step-by-step approach makes it easier to understand the body and its movements.
The first thing beginners learn is to draw the head. The Loomis Method shows how to make the head the right size and shape in relation to the rest of the body. Once you get the head right, it’s much easier to draw the rest of the body. This method is designed to help you avoid mistakes and make your drawings look realistic.
As you practice, you learn how to use basic shapes to create arms, legs, and torsos. With these simple tools, you can start sketching full-body figures. The more you practice, the better you’ll get at placing the body parts in the right places. It’s a great way for beginners to feel confident in their skills.
One of the reasons the Loomis Method works so well for beginners is because it keeps things simple. It shows you how to focus on the big picture first, without getting stuck on small details. Over time, you’ll develop the skills to add the details, making your drawings come to life.
Step-by-Step Guide to Understanding the Loomis Method
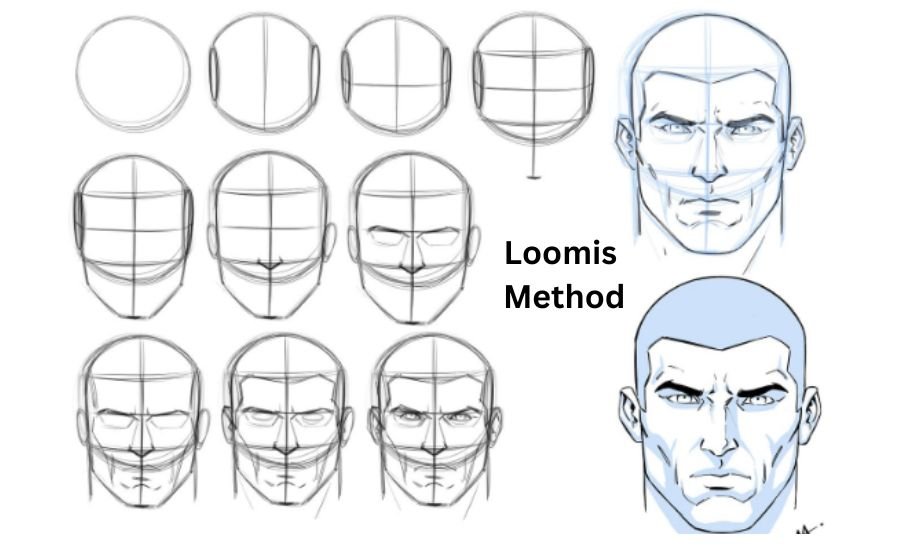
If you’re ready to dive into the Loomis Method, it’s important to start with the basics. First, learn how to draw the head. The Loomis Method teaches you to draw the head as a simple oval or circle. From there, you add guidelines to help you place the eyes, nose, and mouth in the right places.
Once the head is drawn, the next step is to sketch the body. Start by drawing a basic stick figure to show where the arms, legs, and torso will go. Then, use simple shapes like cylinders and ovals to flesh out the body. This method helps you understand how the body is connected, making it easier to draw a figure that looks balanced.
After you’re comfortable with the basic shapes, start refining your drawing. You’ll add more detail, like muscles and clothing, but always remember to keep the proportions in mind. The Loomis Method helps you keep your focus on the body’s structure, so you don’t get lost in tiny details too soon.
As you practice this step-by-step method, you’ll get faster and more confident. Eventually, you’ll be able to draw more complex poses and perspectives. The Loomis Method is designed to help you build a strong foundation in figure drawing, and once you master it, your artwork will improve greatly.
The Key Shapes in the Loomis Method for Drawing the Human Body

The Loomis Method relies on simple shapes to help you draw the human body. These shapes make it easier to understand the body’s structure and proportions. For example, when drawing the head, you start with a circle and then add lines to mark the features. This approach helps you avoid drawing a head that’s too big or too small.
For the body, the Loomis Method uses ovals and cylinders to represent different parts, like the torso, arms, and legs. By breaking down the body into these simple shapes, you can draw it more accurately. It’s like building a model: each part fits together, and once you have all the shapes in place, you can start adding more detail.
Another important shape is the rib cage. The Loomis Method shows you how to draw it as a box-like shape that fits around the upper body. This helps you understand the form of the chest and how it connects to the rest of the body. Once you understand these basic shapes, drawing the human body becomes a lot easier.
The key shapes in the Loomis Method also help with movement. When you want to draw a person in action, you can use these shapes to quickly sketch out the pose. This method gives you the tools to draw bodies in various positions without worrying about getting the proportions wrong.
Why Use the Loomis Method in Your Art Practice?
The Loomis Method is a great tool for anyone looking to improve their figure drawing. One reason is that it teaches you how to break down complex figures into simpler shapes. This approach makes drawing the human body less intimidating and helps you understand proportions better.
Using this method in your art practice gives you a solid foundation. It’s not just about drawing the body; it’s about understanding how all the parts work together. Once you master this technique, you’ll find it easier to draw figures in different poses and from various angles.
Another reason to use the Loomis Method is that it’s flexible. You can use it for both realistic and stylized drawings. Whether you want to draw a realistic portrait or a cartoon figure, this method can help you create a well-proportioned body. The basic principles stay the same, no matter your style.
Lastly, the Loomis Method is a time-saver. Once you’re familiar with the shapes and techniques, you can draw figures quickly and accurately. It’s a great way to practice and improve without getting frustrated. As you continue practicing, you’ll see how this method speeds up your drawing process.
The Loomis Method: A Simple Way to Learn Human Proportions
Understanding human proportions is key to drawing the body correctly. The Loomis Method helps you learn proportions by breaking down the body into basic shapes. This makes it easier to see how different body parts relate to each other in size and placement.
For example, the method shows you that the height of the body is usually about seven and a half heads tall. By using this guide, you can make sure your figures are the right size. It also teaches you how to space the arms, legs, and other parts correctly.
The Loomis Method also uses the head as a measurement tool. Once you know the size of the head, you can use it to figure out how big other parts of the body should be. This helps you avoid making arms too long or the torso too short. The result is a more realistic and balanced drawing.
Learning proportions with the Loomis Method is important for artists who want to improve their skills. It’s a simple, easy-to-understand way to make sure your drawings look correct. Once you’ve mastered this, you’ll be able to draw people in different poses and perspectives.
How to Start Drawing with the Loomis Method
Starting with the Loomis Method can be easy if you follow a few basic steps. First, gather your materials: paper, pencils, and an eraser. Begin by drawing simple shapes, like circles and ovals, to represent the head and body. These shapes are the foundation of your figure.
Once you have the basic shapes down, add guidelines to help you place the features of the face and the limbs. Use straight lines to show where the arms and legs will go. After you’ve done this, start fleshing out the figure with more detailed shapes, but keep it simple.
As you practice, focus on getting the proportions right. The Loomis Method is all about learning the structure of the body. Don’t worry about perfect details yet; just focus on the overall shape and balance. With time, you’ll get better at making your figures more realistic.
Finally, don’t forget to practice! Like any new skill, drawing with the Loomis Method takes time. Keep practicing every day, and soon you’ll see improvements. This method is designed to help you draw with confidence and accuracy.
Common Mistakes to Avoid When Using the Loomis Method

When using the Loomis Method, there are a few common mistakes that beginners often make. One mistake is drawing too many details too early. The Loomis Method focuses on building the figure with basic shapes first. If you jump straight to details, you might get the proportions wrong.
Another mistake is not paying enough attention to the basic shapes. The body should be constructed using ovals, circles, and cylinders. Skipping this step can lead to a body that looks out of balance. Take your time to get the shapes right before moving on to the next step.
It’s also easy to get caught up in the face and features. While the Loomis Method teaches how to draw the face, it’s important to remember that the whole body should be your focus. Sometimes beginners spend too much time on the head, which can mess up the body’s proportions.
Lastly, some people rush through the practice. Drawing takes time, especially when you’re learning the Loomis Method. Be patient with yourself and practice regularly. The more you practice, the better your figures will look.
How the Loomis Method Improves Your Drawing Skills
The Loomis Method is a powerful tool that helps improve your drawing skills. One way it does this is by teaching you to draw with a focus on structure. Instead of jumping into the details, you start by creating a solid foundation with simple shapes. This makes the rest of the drawing process easier.
Another way it helps is by making you more aware of proportions. Understanding how the head, arms, legs, and torso all fit together in the correct size and shape is crucial. The Loomis Method gives you the tools to draw realistic figures with correct proportions every time.
As you use the Loomis Method more, you’ll start to draw faster and more confidently. This is because you’re building good habits and practicing with a structured method. Over time, you’ll get better at sketching from your imagination without needing to rely on references as much.
By practicing the Loomis Method, you’ll also improve your understanding of human anatomy. This will help you draw more complex figures and poses in the future. The method is an excellent way to build a strong foundation in figure drawing.
Tips for Mastering the Loomis Method in Your Artwork
To truly master the Loomis Method, there are a few tips you can follow.
- First, start by practicing regularly. The more you practice, the more comfortable you’ll become with the shapes and proportions. Make sure to practice different poses and angles to challenge yourself.
- Another tip is to study anatomy. While the Loomis Method simplifies the body into shapes, understanding real anatomy will help you draw more accurately. Look at reference images and try to understand how muscles and bones affect the body’s form.
- It’s also important to focus on one thing at a time. Don’t rush through the steps. First, learn how to draw the head, then move on to the body. By taking it slow, you can build your skills more effectively.
- Lastly, don’t forget to seek feedback. Show your drawings to other artists or teachers who are familiar with the Loomis Method. They can offer tips and suggestions to help you improve faster. Keep learning and practicing, and you’ll see great progress!
Understanding Loomis Method’s Approach to the Head and Face
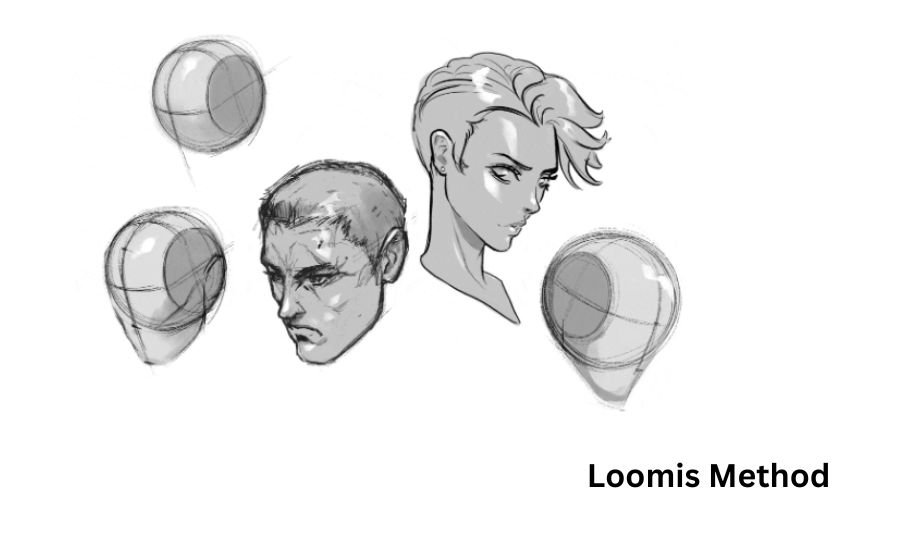
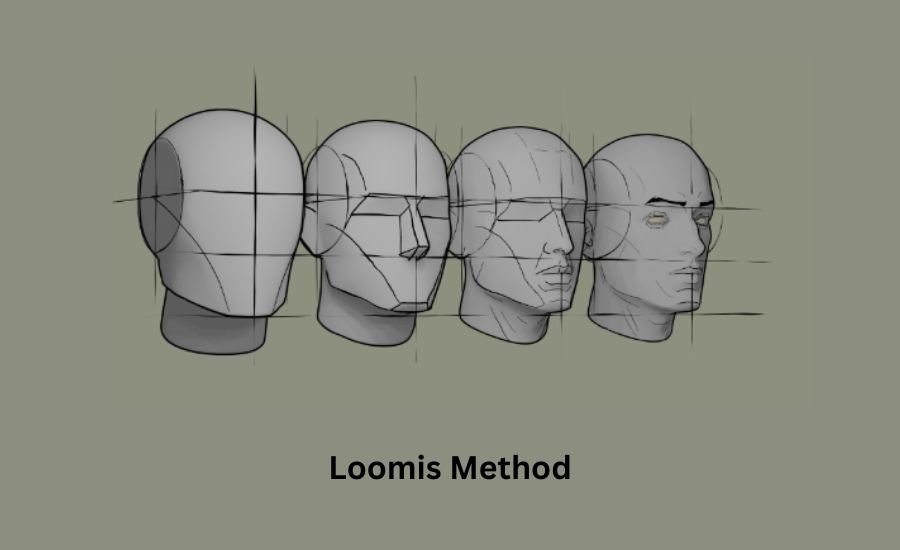
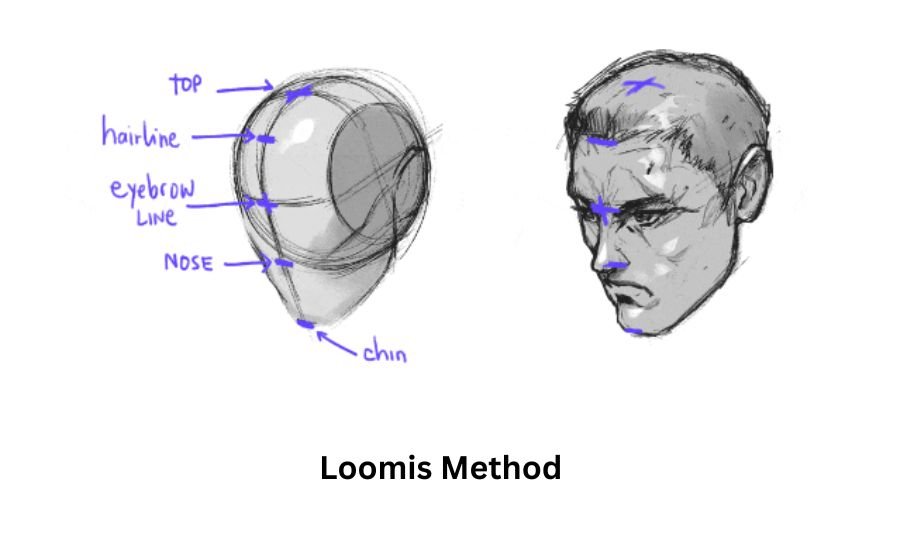
The Loomis Method has a unique approach to drawing heads and faces. It starts by drawing a simple circle to represent the head, then uses lines to help you place the features in the right spots. This method helps ensure that the face is proportionate and balanced.
Once the basic shape of the head is drawn, the Loomis Method guides you on where to place the eyes, nose, and mouth. The method teaches that the eyes should be about halfway down the head, which is crucial for getting the face right. It also shows where the ears, neck, and chin should go.
By breaking the head down into simple shapes, the Loomis Method helps you avoid common mistakes like drawing eyes that are too big or the nose too small. This approach makes it easier to draw faces that look realistic and well-proportioned.
Over time, as you practice this method, you’ll get better at drawing faces from different angles. The Loomis Method gives you the tools to draw any face, whether it’s straight on, in profile, or from above or below. With practice, you’ll be able to draw faces that are dynamic and full of life.
You Must Read: House-of-the-rising-sun
How the Loomis Method Breaks Down Complex Figures

One of the great things about the Loomis Method is how it simplifies complex figures. When you start drawing, it might seem like there’s a lot to learn. But the Loomis Method helps you break the body down into smaller, manageable parts. This makes it easier to understand and draw complex poses.
For example, the method teaches you how to draw the body using basic shapes like ovals and cylinders. These shapes represent parts of the body, such as the chest, arms, and legs. Once you understand how the body fits together with these shapes, you can draw any pose.
The Loomis Method also teaches how to draw people in different perspectives. Whether you’re drawing someone standing or sitting, or even running, this method can be adapted to fit all kinds of poses. You simply adjust the shapes to match the angle you want to draw from.
As you practice, you’ll find that drawing complex figures becomes less intimidating. The more you break down the figure into simple shapes, the easier it is to see how everything fits together. This method is an excellent tool for drawing figures in motion or in tricky poses.
Why Artists Love the Loomis Method for Figure Drawing
Artists love the Loomis Method because it’s practical and effective. It’s a simple way to learn how to draw the human body without getting overwhelmed by details. The method provides a clear structure that helps artists create balanced, well-proportioned figures.
This method is also popular because it works for all levels of artists. Whether you’re a beginner or an advanced artist, the Loomis Method helps you build a strong foundation. Even professional artists use it to quickly sketch figures or to improve their skills.
Another reason artists love this method is its flexibility. The Loomis Method can be adapted for different styles of art. Whether you’re drawing realistically or in a cartoon style, this technique will help you create accurate figures. It’s a versatile tool that works for any artist’s needs.
For many artists, the Loomis Method becomes a go-to technique that they use every time they draw. It’s a reliable way to create figures that look good and have the right proportions. Once you get comfortable with it, you’ll find yourself drawing better and faster.
Beginner’s Guide: Drawing the Body Using the Loomis Method
If you’re new to drawing and want to learn how to draw the body, the Loomis Method is the perfect place to start. The first step is to break the body down into simple shapes. Start by drawing the head as a circle, and use straight lines to guide where the arms, legs, and torso will go.
Once you have the basic shapes in place, you can refine them into the body’s structure. Draw the torso as an oval, and the arms and legs as cylinders. By using these basic shapes, you’ll find it much easier to draw the body without worrying about getting every detail perfect right away.
The Loomis Method also teaches you how to understand the proportions of the body. By measuring the body using the head as a guide, you can make sure that the arms, legs, and torso are the right size. This step is important because it helps you avoid drawing figures that are too tall, short, or out of proportion.
As you practice, keep in mind that the key is to take it slow and practice regularly. The more you practice drawing the body using the Loomis Method, the easier it will become. Over time, you’ll be able to draw full-body figures in any pose with confidence.
Conclusion
In conclusion, the Loomis Method is an excellent way to learn how to draw figures and faces with the right proportions and structure. By starting with simple shapes, you can build up to more complex drawings. It’s a helpful tool for both beginners and experienced artists who want to improve their skills. With regular practice, you’ll see great results in no time!
The best part about the Loomis Method is that it makes drawing easier and more fun. As you get more comfortable with it, you’ll be able to sketch figures quickly and confidently. Whether you want to draw realistic humans or create characters for cartoons, the Loomis Method is a great tool to help you achieve your artistic goals. Keep practicing and enjoy the journey!
Read More: How-can-help-you-abpv-make-money-easily
FAQs
Q: What is the Loomis Method?
A: The Loomis Method is a way of drawing the human body by breaking it down into simple shapes like circles and cylinders. It helps artists draw figures with correct proportions.
Q: Is the Loomis Method good for beginners?
A: Yes, the Loomis Method is great for beginners because it simplifies drawing the human body and helps you understand proportions easily.
Q: How long does it take to learn the Loomis Method?
A: It depends on how often you practice, but with regular practice, you can start seeing improvement in a few weeks.
Q: Can I use the Loomis Method for drawing faces?
A: Yes, the Loomis Method is very useful for drawing faces. It helps you place features like eyes, nose, and mouth in the right spots.
Q: Do I need to be good at drawing to use the Loomis Method?
A: No, you don’t need to be great at drawing to start using the Loomis Method. It’s designed to help artists of all levels.
Q: Can I use the Loomis Method for different drawing styles?
A: Yes, you can! The Loomis Method works for both realistic and cartoon styles of drawing.
Q: How often should I practice the Loomis Method?
A: Practicing a few times a week is a good start. The more you practice, the better you’ll get!
